Car diagnostic tools information by obd2tool

Welcome to my blog,here some auto diagnostic tools will be displayed. If you want to know more information,you can visit our official website: www.obd2tool.com.

Car diagnostic tools information by obd2tool

Welcome to my blog,here some auto diagnostic tools will be displayed. If you want to know more information,you can visit our official website: www.obd2tool.com.

Who will buy the Autel Maxisys Elite Diagnostic Tool

If you’re looking for nothing less than the best OBD2 scanner on the market, then look no further than the Autel Maxisys elite scan tool. Autel Scanner is well known for their quality scanner. And the Autel Maxisys is well-known for its speed, multi-tasking, and simplicity. The Autel MS908CV scanner has the same features, but less processor power(means a little bit slow). It is the Upgraded Version of Autel Maxisys MS908P Pro. For the many years that I have repaired and maintained different car models and makes in my car repair shop, this has been one of the most reliable scanners that I have used over the years. Read this Autel Maxisys Elite review to know more about this advanced diagnostic tool.
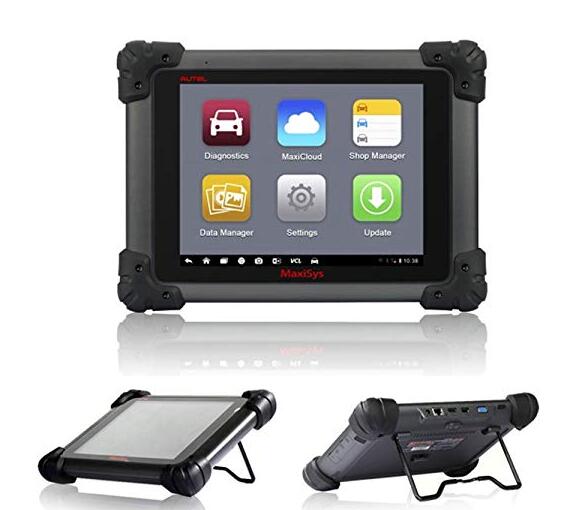
Who will buy the Autel Maxisys Elite Diagnostic Tool?

The Autel Maxisys elite diagnostic scanner is the perfect scanner for busy and professional mechanics as well as technicians. Let the price not deter you from acquiring this fast, efficient, and comprehensive diagnostic scan tool. You can also use it on a variety of car brands, and its ergonomic design is fun to have in the hands. The Wi-Fi connection makes updating easy and the large LCD displays make reading and erasing codes to be quick.
Technical Specifications of the Autel Maxisys Elite Scanner
Features

Autel Maxisys Elite
Works:     All 1996 and newer vehicles
OS:     Android 4.4.4 KitKat
Display:     9.7” Retina display with 2048X1536 resolution & Capacitive touch screen
Processor:     NVIDIA Tegra? 4 (4-PLUS-1 Quad-core Processor) 1.8GHz with ARM Cortex – A15 CPU
Memory:     2GB RAM & 32GB Embedded Memory
Camera:     Rear: 8.0 Megapixel, Autofocus with Flashlight
Front: 2.0 Megapixel
Sensors:     Ambient Light Sensor, G-sensor
Connectivity:     802.11a/b/g/n/ac WIFI
Version 2.1 3Mbs Bluetooth
RJ45 Ethernet Connection
3.0 USB (2.0 Compatible)
HDMI 1.4a
SD Card (Support up to 32GB)
Audio Input/Output:     Microphone
Dual Speakers
3-Band 3.5 mm stereo/standard headset jack
Input Voltage:     DC/12V/3A
Power and Battery:     3.7V/13600mAH Lithium-polymer battery
DC/12V/3A Power Supply
Power Consumption:     Max 20W
Storage Temperature:     -20 to +70°C
Operating Temperature:     -10 to +55°C
Models:     More than 80 US domestic, Asian and European
WiFi, Bluetooth:     Yes
Protocols:     Most OBD1/OBD2
Check Engine Light(MIL):     Yes
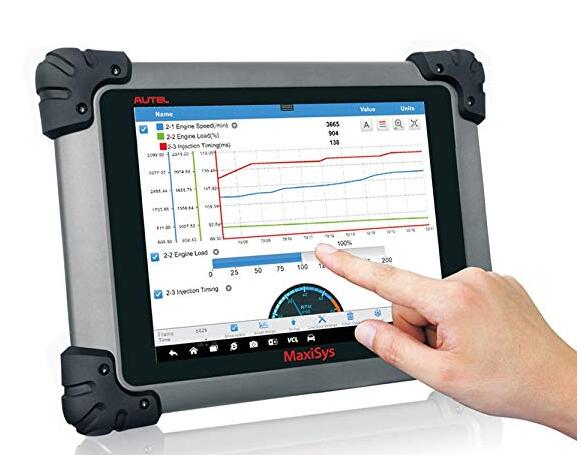
Reads, stores Data:     Yes
Clears codes & resets monitors:     Yes
Playbacks live sensor data:     Yes
Views freeze frame data:     Yes
Remote Control Tech Support:     Yes
Real-Time push message notifications:     Yes
Get transmission codes:     Yes
Software Update:     1 year free update
Warranty:     One year warranty

Autel Maxisys Elite vs Autel Maxisys MS908P

To compare this product with its rival brands, let’s take an example of Autel Maxisys Pro MS908p.

This Autel Maxisys Pro MS908P offers ECU coding, programming, and extensive coverage.

But, a few users have complained that it loses communication with the Audi and VW car models.

In addition, if you select an option, it will display — your vehicle doesn’t support this function. This scan tool also provides frequent connection errors.

Thus, you will eventually have an utterly disappointing and frustrating experience.

However, the main difference between the Autel Maxisys is the CPU. The CPU of the Autel Maxisys Elite is NVIDIA Tegra Quad-Core Processor 1.8GHz.

5-1
While The Autel Maxisys Pro MS908p has the Samsung Exynos Quad-Core Processor 1.4GHz.

Thus, if you are looking for a reliable automotive scanner that’s worth your investment, then do not hesitate to buy Autel Maxisys Elite. This brilliant tool will always offer you a fast and excellent performance.

5-2

But if you don’t care much about the speed ,Obd2 tool Autel Maxisys Pro MS908P is also a great choice for you.

Pros

Super fast diagnosis
Auto-Vin Technology
Battery Recharge
Extensive Vehicle Coverage
Smart Screen
Sufficient Storage Capacity
Autofocus Camera
Easy Printing
High-Level Configuration
DataLogging
Compact and Light
MaxiFix

Cons

The Maxisys Elite is not suitable for the low-end mechanics as the operational procedures are quite complicated. It mainly targets professionals in Auto-repairing and Garage Shops.
It is a high-end product and is not affordable to everyone who would want to use.

5-3

https://www.gamerlaunch.com/community/users/blog/4750493/1914105/autel-maxisys-elite-professional-automotive-diagno/?gid=535

MaxiSys Elite Diagnostics Operations

By establishing a data link to the electronic control systems of the vehicle being serviced through the VCI device, the Diagnostics application allows you to retrieve diagnostic information, view live data parameters, and perform active tests. The OBD2 Scanner application can access the electronic control module (ECM) for various vehicle control systems, such as engine, transmission, antilock brake system (ABS), airbag system (SRS) and more.

Establishing Vehicle Communication
The Diagnostics operations require connecting the Autel Maxisys Elite Diagnostic Platform to the test vehicle through the VCI device using the main cable, and test adapters (for non-OBD II vehicles). To establish proper vehicle communication to the MaxiSys display tablet, you need to perform the following steps:
1.  Connect the VCI device to the vehicle’s DLC for both communication and power source.
2.  Connect the VCI device to the MaxiSys dispvlay tablet via BT pairing, USB connection, or Ethernet connection.
3.  When these are done, check the VCI navigation button at the bottom bar on the screen, if the button displays a green tick icon at the lower right corner, the MaxiSys Elite diagnostic platform is ready to start vehicle diagnosis.

Vehicle Connection
The method used to connect the VCI device to a vehicle’s DLC depends on the vehicle’s configuration as follows:
1  A vehicle equipped with an On-board Diagnostics Two (OBD II) management system supplies both communication and 12-volt power through a standardized J-1962 DLC.
2  A vehicle not equipped with an OBD II management system supplies communication through a DLC connection, and in some cases supplies
12-volt power through the cigarette lighter receptacle or a connection to the vehicle battery

OBD II Vehicle Connection
This type of connection only requires the main cable without any additional adapter.
 To connect to an OBD II vehicle
1.  Connect the main cable’s female adapter to the Vehicle Data
Connector on the VCI device, and tighten the captive screws.
2.  Connect the cable’s 16-pin male adapter to the vehicle’s DLC, which
is generally located under the vehicle dash.

Non-OBD II Vehicle Connection
This type of connection requires both the main cable and a required OBD I adapter for the specific vehicle being serviced.
There are three possible conditions for Non-OBD II vehicle connection:
1  DLC connection supplies both communication and power.
2  DLC connection supplies communication and power is to be supplied via the cigarette lighter connection.
3  DLC connection supplies communication and power is to be supplied via connection to the vehicle battery.

 To connect to a Non-OBD II Vehicle
1.  Connect the main cable’s female adapter to the Vehicle Data Connector on the Autel Scanner, and tighten the captive screws.
2.  Locate the required OBD I adapter and connect its 16-pin jack to the main cable’s male adapter.
3.  Connect the attached OBD I adapter to the vehicle’s DLC.

To connect the cigarette lighter
1.  Plug the DC power connector of the cigarette lighter into the DC power supply input port on the device.
2.  Connect the male connector of the cigarette lighter into the vehicle’s cigarette lighter receptacle.

To connect the clipper cable
1.  Connect the tubular plug of the clipper cable to the male connector of the cigarette lighter.

32-1

2.  Plug the DC power connector of the cigarette lighter into the DC power supply input port of the J2534 programming device.
3.  Connect the clipper cable to the vehicle’s battery.