Car diagnostic tools information by obd2tool
Welcome to my blog,here some auto diagnostic tools will be displayed. If you want to know more information,you can visit our official website: www.obd2tool.com.Car diagnostic tools information by obd2tool
Welcome to my blog,here some auto diagnostic tools will be displayed. If you want to know more information,you can visit our official website: www.obd2tool.com.How to install the VAG COM VCDS HEX V2

The HEX-V2 Enthusiast USB Interface works with VCDS (VAG-COM Diagnostic System) via USB turning a Windows PC into a factory level diagnostic tool for Volkswagen, Audi, Seat or Skoda automobiles.
There are so many different language for you option, when you make the order you can leave massage to us which language do you need. Because we could not change the language any more when you receive the goods.
Note:
1.Pls turn off the Anti-virus Software and disconnect internet before installing and using every time , because software was cracked version, can not recognized by Anti-virus software, so some files will be reported to virus, but in fact it is harmless.
2.Systems required: (32bit/64bit) of Windows 7, Windows 8, Windows XP, Windows 10 (but not all Win10 can work). Not supported Windows on VM Systems (Parallels, Virtual Box, etc) ,MAC
3.The CD may be easily broken on the way to destination, so if CD can’t be readable, please DO CONTACT US to send you download link
So many friends when they install the vag com software,they meet some question.how to install the vag com vcds software, the way is as below.
1:Pls turn off the Anti-virus software, as you know, the auto diagnostic tool software, the anti-virus never met it, so default is as virus, so remove or damage the software.
2:pls copy the software on your laptop desktop.pls note: this model could not update the software, just can use our software.
3: there are instruction to teach how to install the software,so when you install the software you can according the instruction.
4: connect the USB Cable with the laptop and vehicle.
5:Pls install the USB Cable driver
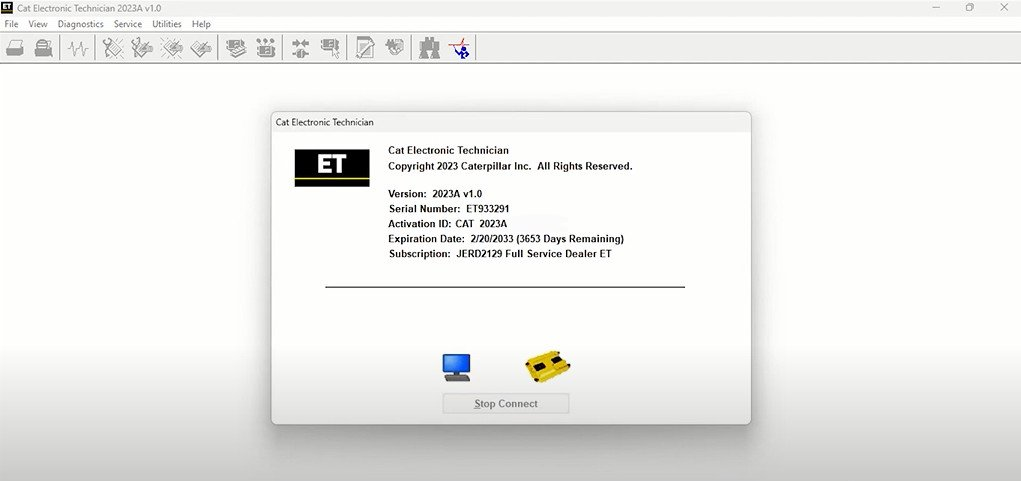
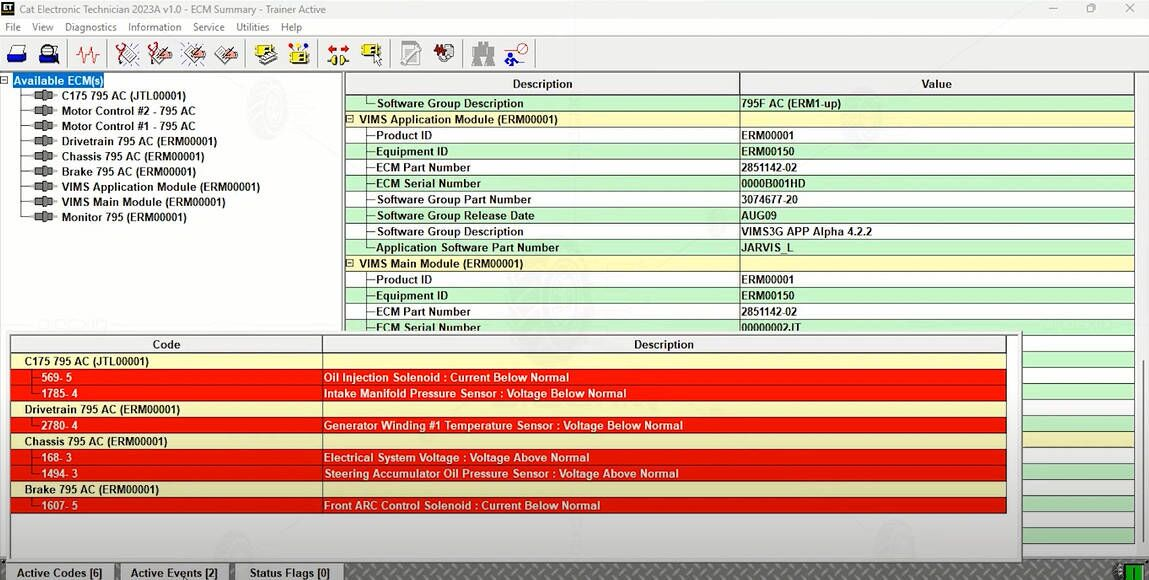
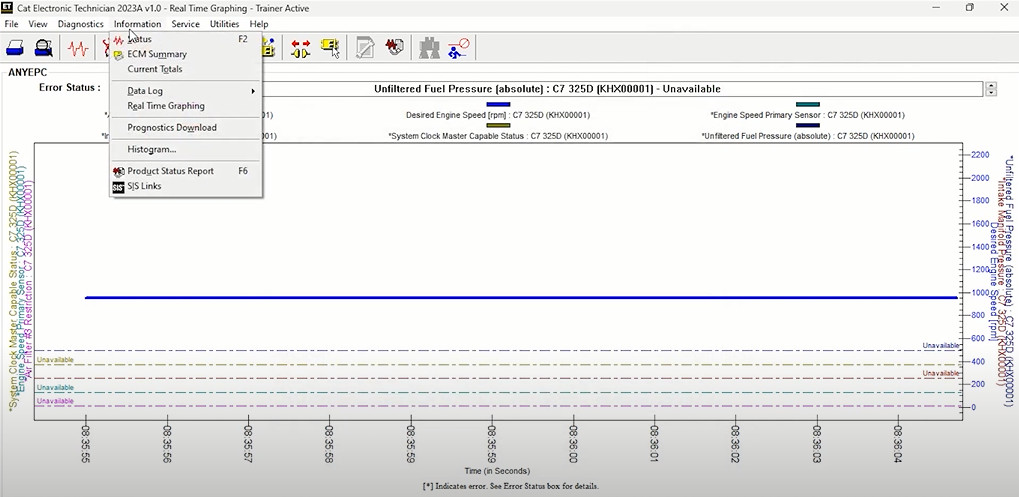
Newest Version Cat Caterpillar ET 2023A Electronic Technician Diagnostic Software is released

Caterpillar electronic technician 2023A (replaces CAT ET 2022C, 2022B, 2022A, 2021A, 2019C) with WinFlash future is an updated version of the caterpillar dealer diagnostic software that can help technicians to diagnose existing and potential problems with their electronically controlled Caterpillar Engines and Machines.
Cat et Caterpillar Electronic Technician Software:
Brand: Caterpillar
Region: WorldWide
Support Multi-language:English, Chinese, Danish, French, German, Italian, Japanese, Portuguese, Russian, Spanish
Support All cars of CAT
Software display:

If you want more Heavy Duty Truck Scanner Tool,please click below link:
https://www.obd2tool.com
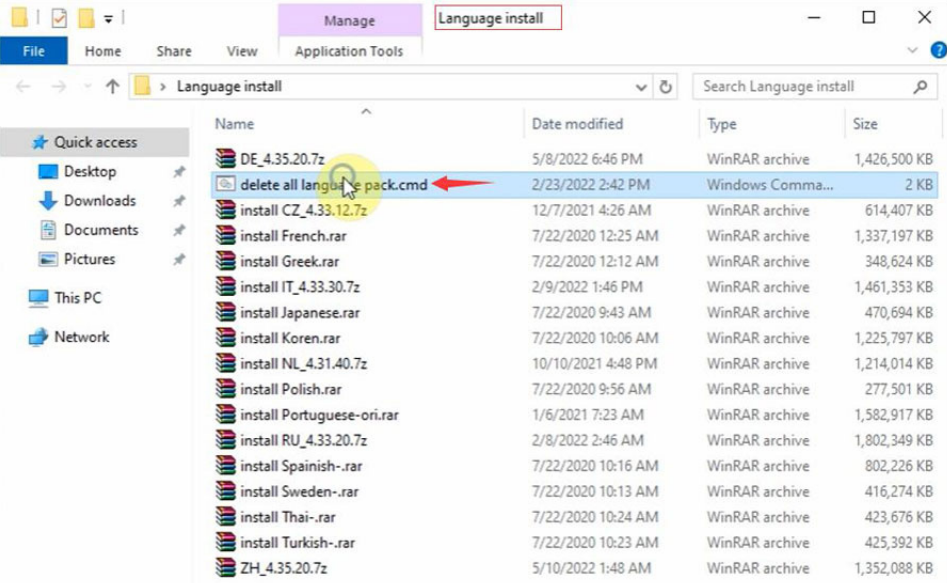
How to change the BMW ICOM ISTA-D ISTA-P Language

BMW ICOM are with multi-language,if you want to change the language,pls let us know when you make the order,or default be english. If you want to change the language after receive goods. how to operate as following:
How to change the ISTA-D language?
ISTA-D Language: Czech, Dutch, French, German, Greek, Italian, Japanese, Korean, Polish, Portuguese, Russian, Spanish, Sweden, Thai, Turkish
Open the language install folder on the desktop
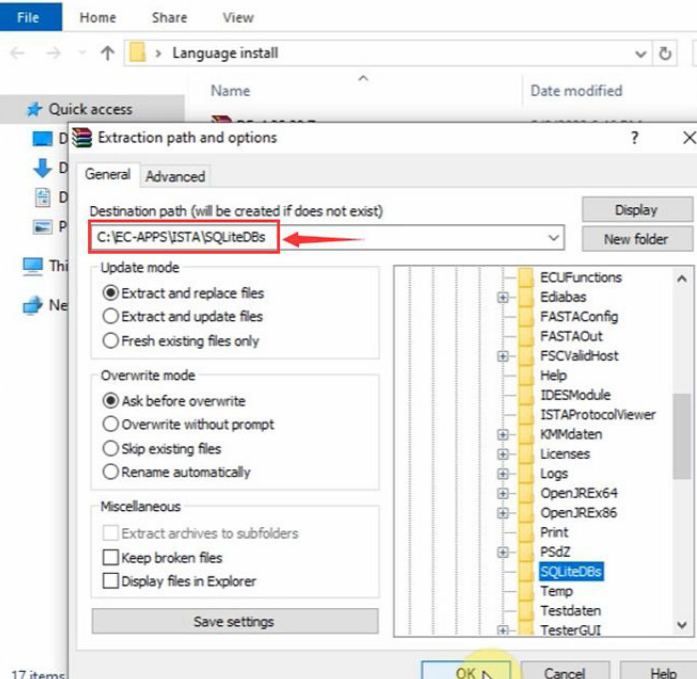
Extract the language pack you desired, extract install.rar to C:/EC-APPS/ISTA/SQLiteDBs
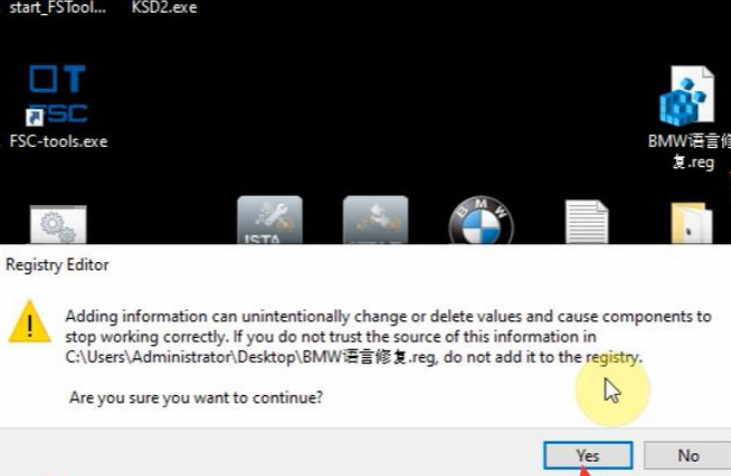
Click the bmw language fix program on desktop
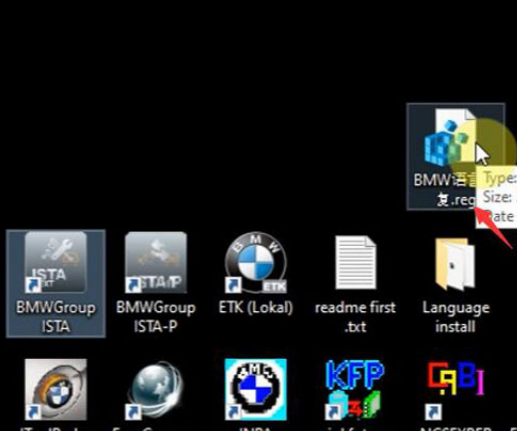
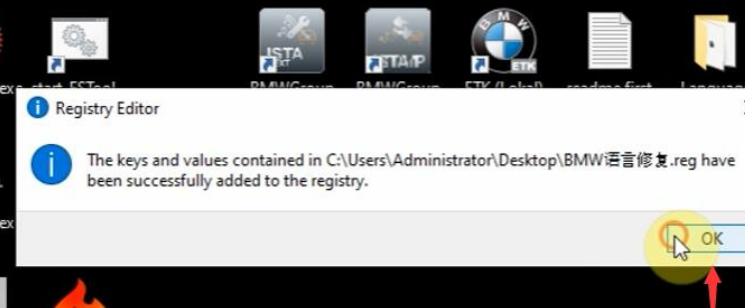
Open BMW Group ISTA program on the desktop
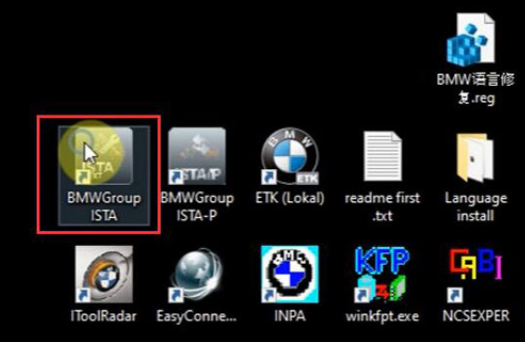
Select tool tab-client setting
Select the corresponding language
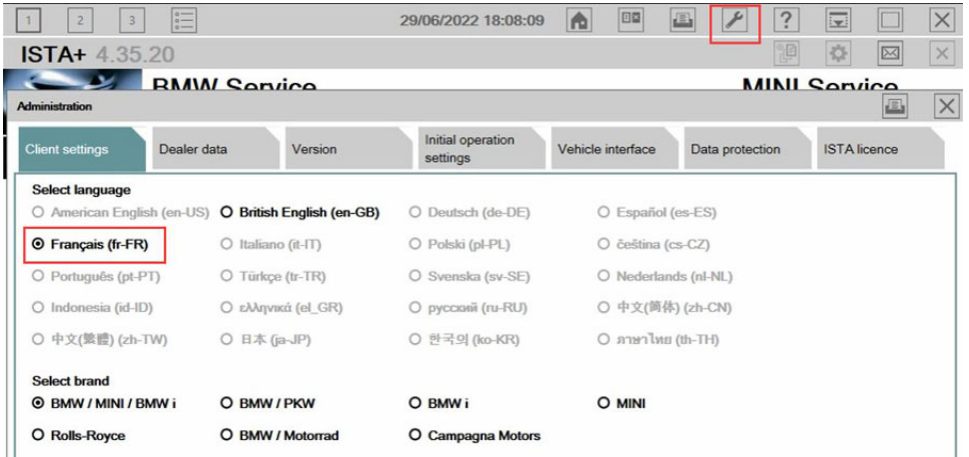
Which language do you want to you can choose,
EXIT ISTA-D and run again,
2: how to change the ICOM ISTA-P Language?
ISTA-P Language: English, Chinese, Czech, Dutch, French, German, Greek, Indonesian, Italian, Japanese, Korean, Polish,Portuguese, Russian, Spanish, Swedish, Thai, Turkish
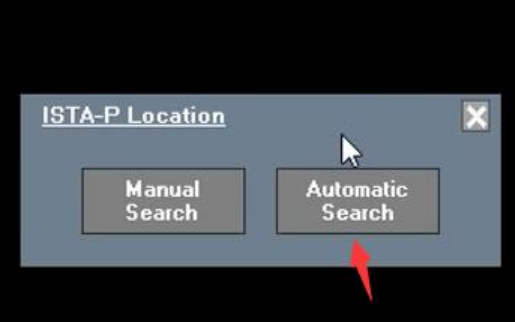
Open BMW GROUP ISTA-P on desktop
Click i icon and reset settings

Select Automatic search
Choose which language you want
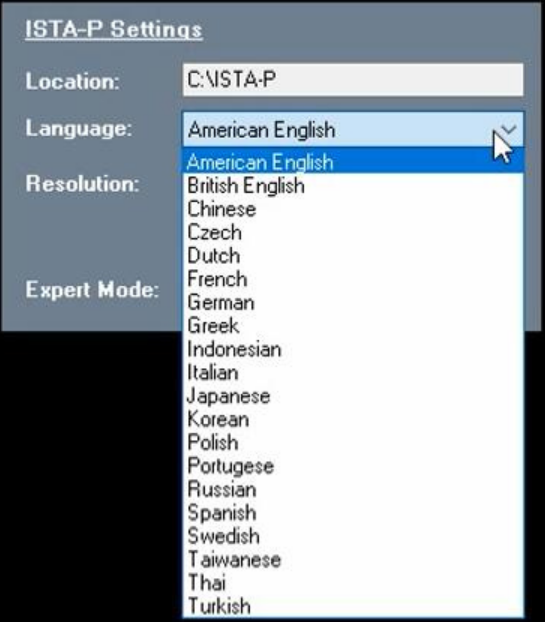
After choose well you need save setting
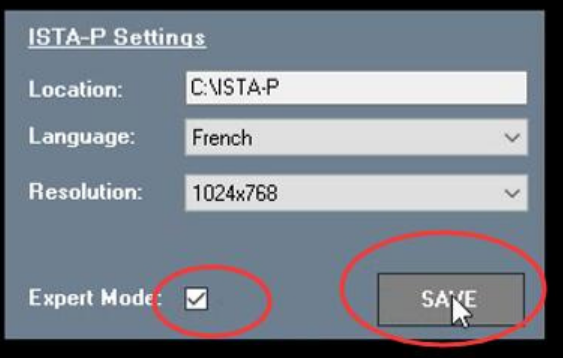
Then you can run it again,
If you need want to learn more,you can contact with us: obd2tool.com
How to Add Smart keys for Toyota Camry 2021 via OBD

Here we are going to show you how to add smart keys for Toyota Camry 2021 via OBD.

Tools:
Xtool X100 Pad3
Working Key*1
New OEM Key*1
Go to
Diagnosis>>Toyota>>By type>>Smart system
We have five types.
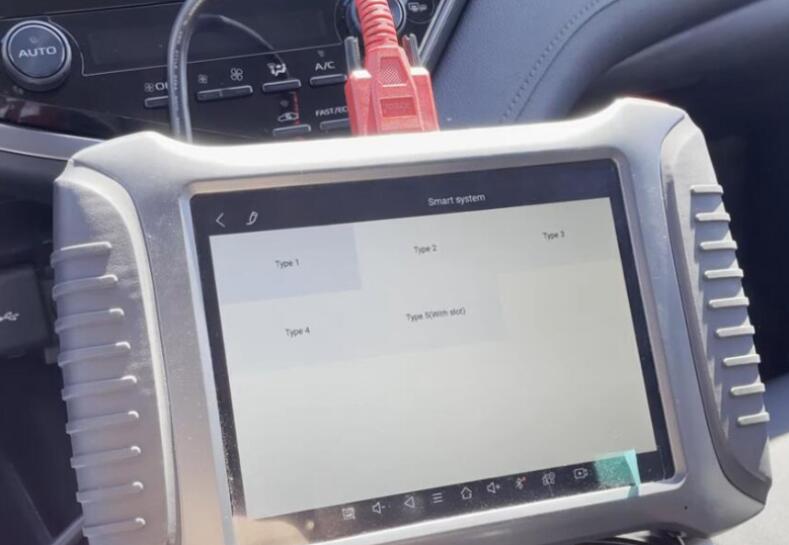
Turn on ignition and try one by one.
Type 1 and 2 failed to connect.
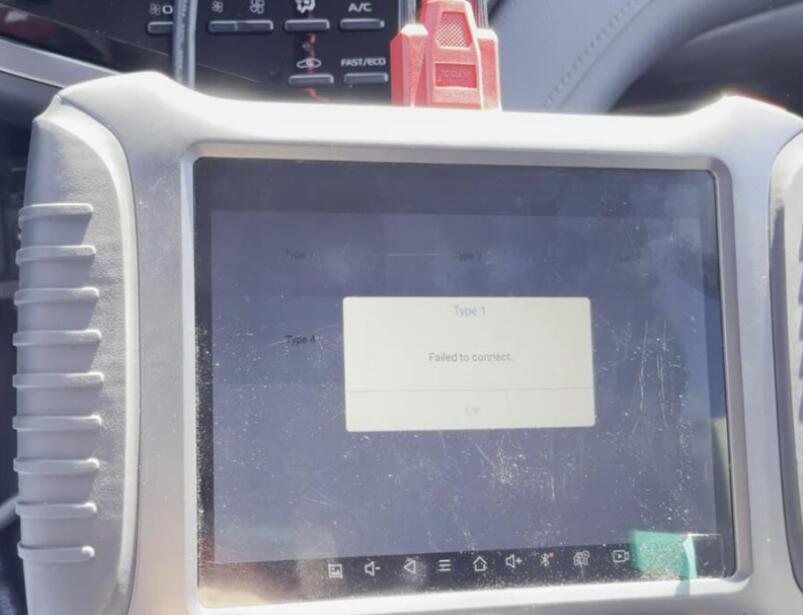
Type 3, we are in.
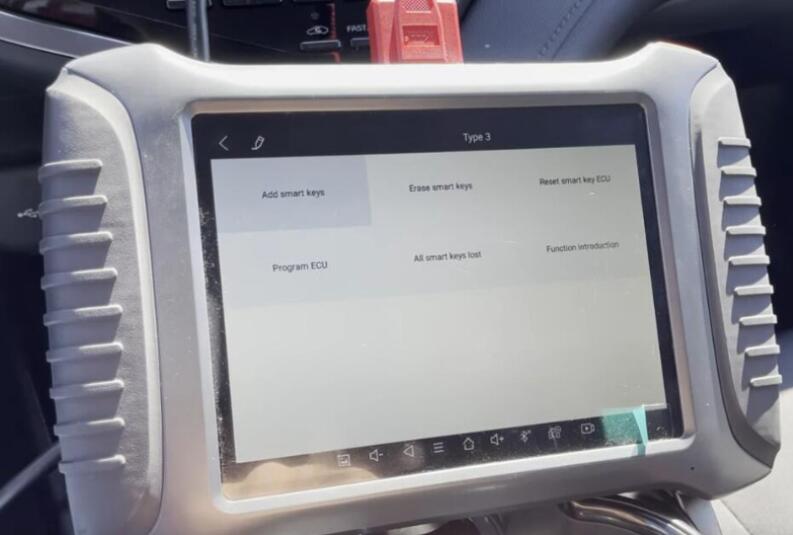
Add smart keys.
Put working key close to Start button.
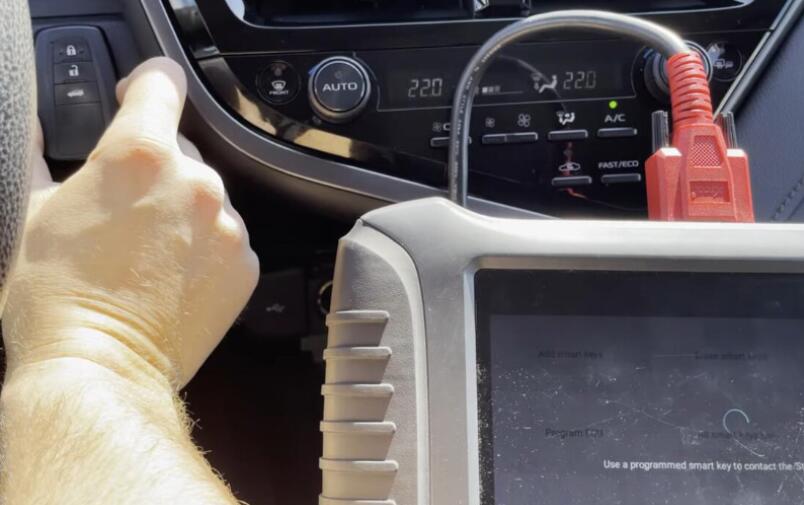
Put new key close to Start button.
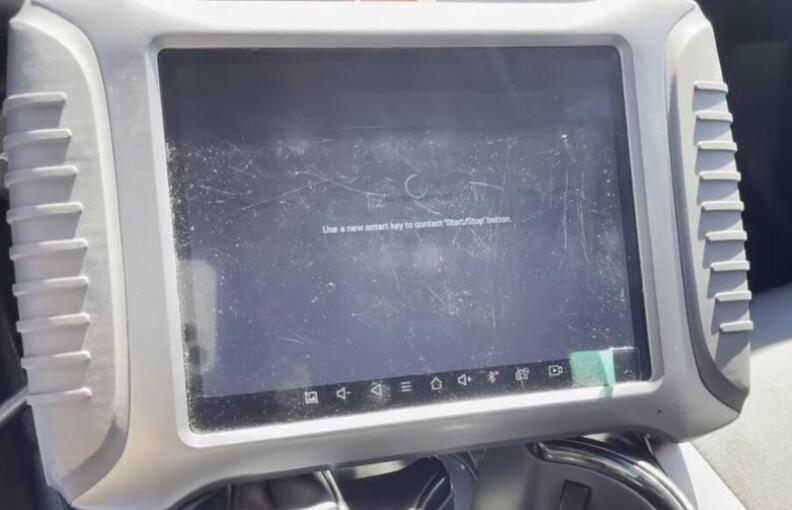
Program success.
Test remote, both work.
Turn on ignition.
Erase smart keys.
Put working key close to Start button.
Erase success.
Done!
That’s how to add/ erase smart keys for 2021 Toyota Camry via OBD port using XTOOL PAD3.
If you want to know more about Auto key programmer, please visit https://www.obd2tool.com
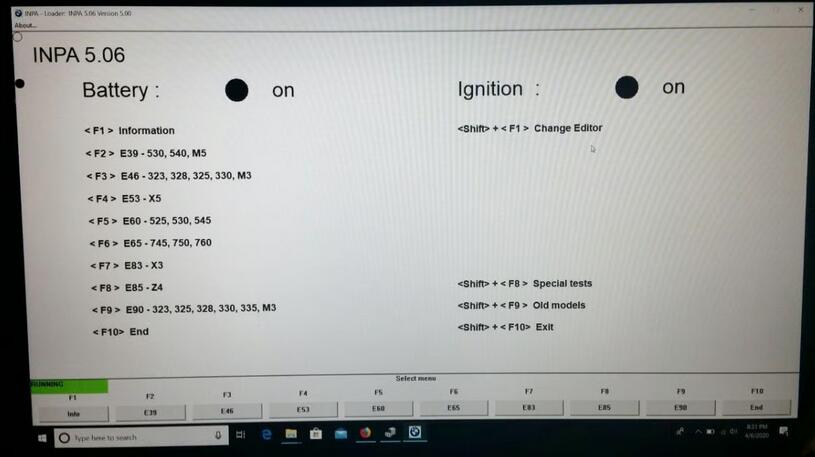
How to Install BMW Standard Tools
This thread describes how I install and configure BMW Standard Tools, the suite of BMW software that includes INPA, NCS Expert, WinKFP, Tool32. I have my own custom way of doing this that is the shortest and simplest steps I could figure out. This set up is for E46 only.
What is needed?
– Windows 7, 8, 10, 11 laptop (32-bit or 64-bit), must have AC adapter plugged in
– K+DCAN cable with a switch, for example: Amazon.com: K+DCAN Cable with Switch
– Installer files from my Google Drive
What are the steps?
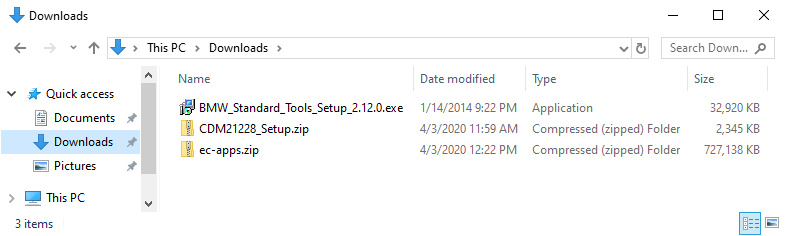
– Download the files
– Run the installer
– Replace the installed folders with ec-apps.zip
– Install the driver for the cable
– Test at the car
The following posts cover each step for Windows 10. Other Windows versions may be slightly different.
1. Download the files
– Use this link to access the BMW Standard Tools shared folder
– BMW Standard Tools – Google Drive
– Download all files in the shared folder
2. Run the Installer
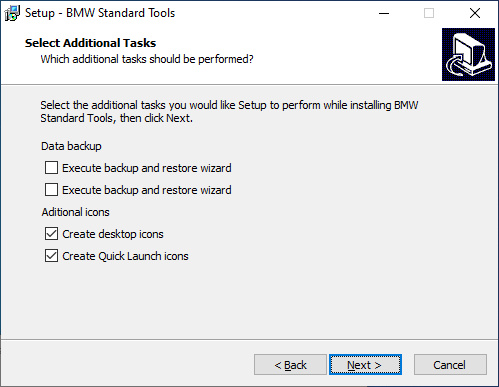
These steps cover running the installer. You accept the defaults on each installer window except one where you uncheck the top two checkboxes. The following steps are for Windows 10.
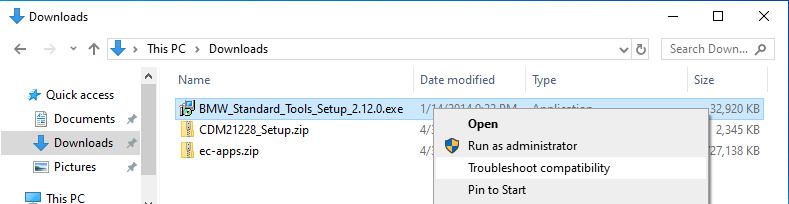
– Open File Explorer and navigate to your Downloads folder.
– Right click on the BMW_Standard_Tools_Setup_2.12.0.exe file, and select Troubleshoot compatibility from the menu.
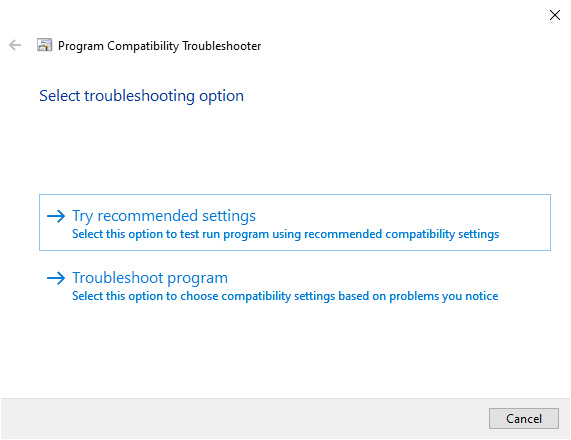
– Under Select troubleshooting option, click Try recommended settings
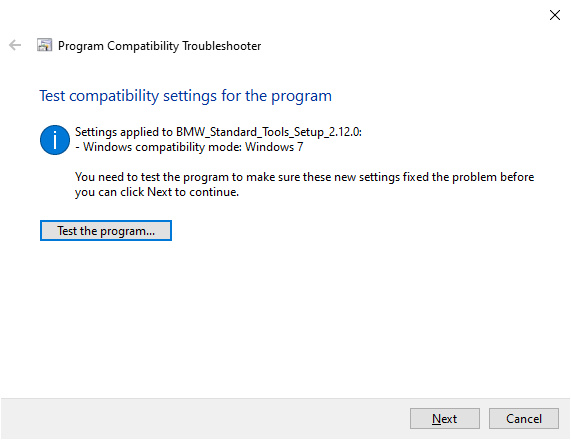
– Under Test compatibility settings for the program, click Test the program
– At the User Account Control pop-up window, click Yes
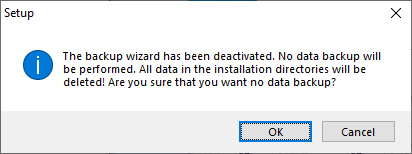
– After the installer launches, accept the defaults and click Next on each page except for the Select Additional Tasks page where you uncheck the top two boxes for Execute backup and restore wizard
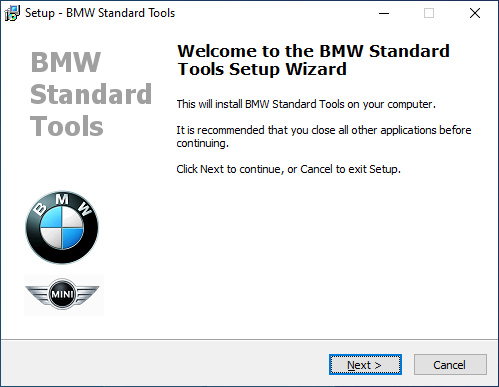
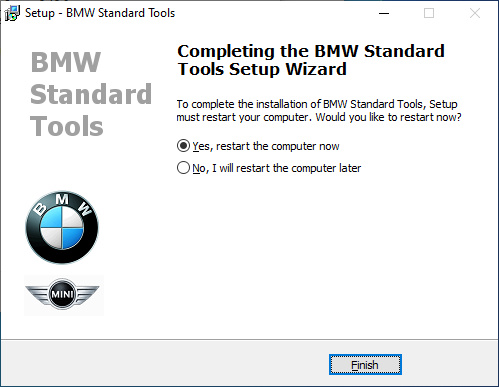
– Continue until the installer gets to the end at the Completing the BMW Standard Tools Setup Wizard window, click Finish to reboot
Launching installer using compatibility mode
3. Replace the installed folders with ec-apps.zip
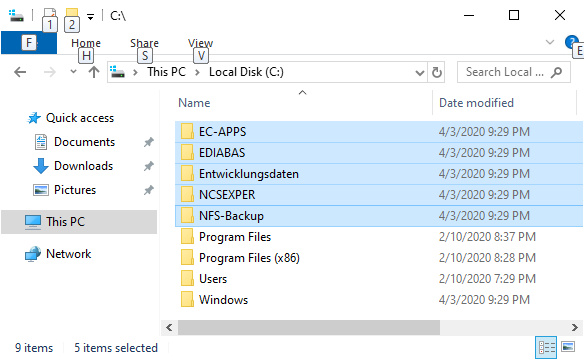
After completing the installer and rebooting, we need to replace the folders created by the installer with those inside the ec-apps.zip file.
The installer creates all the folders and program files, but not the INPA scripts and required data files. The ec-apps.zip file contains the same files and folders the installer puts down, but I’ve added the INPA scripts and imported the data files in all the right places.
– Delete the following folders and all the files inside them
– C:\EC-APPS
– C:\EDIABAS
– C:\Entwicklungsdaten
– C:\NCSEXPER
– C:\NFS-Backup
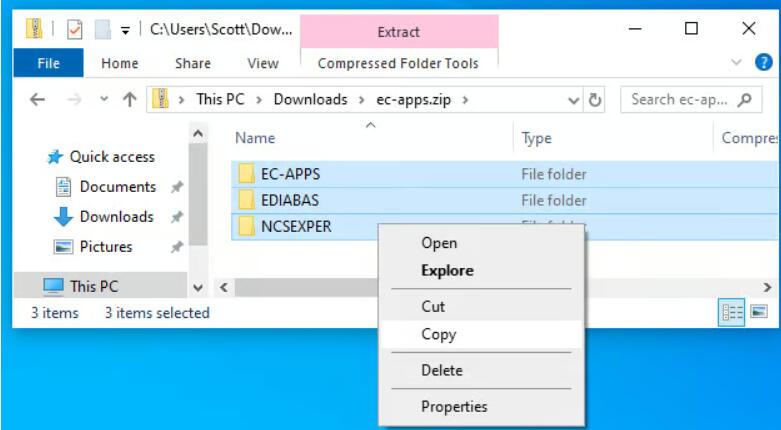
– Extract ec-apps.zip into C:\ so that the following folders are created
– C:\EC-APPS
– C:\EDIABAS
– C:\NCSEXPER

4. Install driver for cable
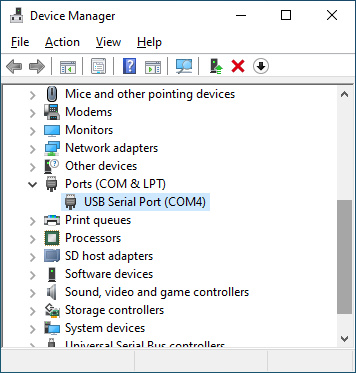
– Open Device Manager
– Plug in the K+DCAN cable
– Wait a few minutes for Windows to automatically install the driver
– If it succeeds, you’ll see a USB Serial Port (COM1) item under the Ports section
– Sometimes Windows fails to install the driver. In that case, extract the CDM21228_Setup.zip file and then run the CDM21228_Setup.exe program accepting all defaults to complete driver installation.
– Verify the COM port shown is COM1. If not, change it to COM1.
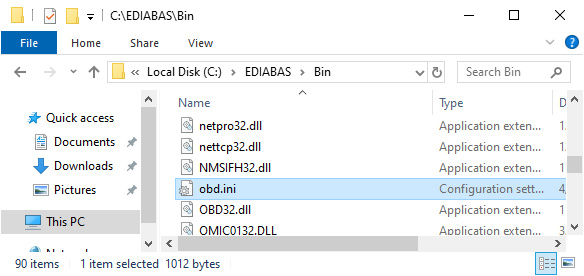
– Or, if you cannot change it to COM1, edit the C:\EDIABAS\BIN\obd.ini file and change the COM port number at the top to match what Device Manager has for the cable. Those two must always match!
Cable under Ports in Device Manager
COM port setting in obd.ini file
5. Test at the car
– Connect the K+DCAN cable to the car and laptop
– Turn ignition key to position 2 (run)
– Turn off all accessories, such as radio, lights, etc.
– Start INPA by double-clicking its desktop shortcut.
– Verify there are two solid black circles at the top of the main screen.
– If they are empty circles, INPA hasn’t connected to the car. Verify the COM port of the cable and in the obd.ini file are the same.
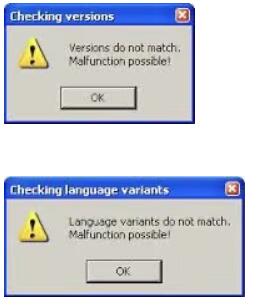
Common INPA errors
If you see these errors when running INPA, you can safely ignore them.